Solutions to the barriers faced by quadriplegics and the technology to make life easier.
Showing posts with label custom made. Show all posts
Monday, February 2, 2015
Adapted Makeup Brush
The photo in this post is a re-creation of a makeup brush, extended by a tongue depressor, held on with white cloth medical tape, that my friend, Delynne, used to use. For whatever reason, she no longer needs this simple but effective adaptation that allows her to independently perform an important part of her grooming.
A lot of people with a disability have perfect grooming lower on the list of priorities, following those list items necessary to live life in a healthy way. Somehow, Delynne has managed to do both and always looks great when you see her. I respect that.
It was good to have a subject to photograph and include that is outside the realm of understanding to a guy like me. She has given me additional subjects to shoot, one of which involves a large space outside, an air compressor, coffee creamer, lasers and a bit of trial and error. You'll know it when you see it this summer.
Source: Doctor's office or order a pack online.
Labels:
beauty,
bristles,
brush,
commercially available,
custom made,
depressor,
extension,
grooming,
handle,
makeup,
tape,
tongue
Monday, November 3, 2014
Lifts - Abilities Council Relic
My work here hasn't ended and my ideas have certainly not dried up. We've just been so happily enthralled with our wonderfully changed life and rapidly growing daughter. Now that we have some routine and rhythm back in our lives, and the busyness of the summer has passed for another year, I'm ready to resume work on Challenging Reality. If you are still with me, still checking for regular updates, thank you! If that's you please spread the word to anyone else you know has been visiting that I will be back with new photos, technology and updates. It may not be the 7 AM Monday morning every week posting that it was before but I won't leave you hanging as long as I did this last phase.
This was the first lift I ever owned. While waiting for the tedious bureaucratic process of planning and approval of renovations to make a home barrier free, in this case my parents' house which I returned to after my stay in rehab, my father decided he wasn't going to wait any longer. Seeing the lift pictured above for sale he purchased it to be temporarily installed at the front door of their home until a proper, modern lift would be approved and installed by insurance. Once that was done this one was handed down to make my access to their cabin virtually effortless.
So, why highlight such an archaic lift that you probably would have trouble finding today? Simply to prove the point that these lifts, which were so abundantly distributed by the Saskatchewan Abilities Council to anyone needing a lift to access their home due to a disability, may not be the most attractive but they are rocksolid reliable. They have their downfalls including having a significant portion of them made from plywood that will rot over time, not having the greatest weather sealing which means the cables inside may need replacing, they are very slow moving and they do not have a set stopping point.
Their operation is a bit finicky including that the lever to activate the lift moves in two directions, one moving the lift up and the other moving the lift down but if you should release the lever and switch to the other direction before the lift comes to a dead stop the platform will continue moving the same direction it was going. This may be a built-in safeguard to prevent any jerking or unnecessary pressure on the cables should the lift be accidentally jammed into the wrong direction. Not having a set stopping point, it's easy enough to determine when to let go of the lever once you have reached the ground but when being elevated to your higher destination the user has to make the decision when to release the lever, taking into account that it will continue to coast for an additional few centimeters, or so.
The safeguards to prevent a user from falling off are entirely manual. The hinged ramp folds up and hooks onto an eyebolt to prevent the user from rolling off. Of course, this is entirely optional and I don't know if I have used it more than a dozen times in 17 years. The lift move slow enough as it is I'm not willing to spend the additional time necessary to lift that gate. I've never fallen off. Ironically, right in front of the bench in the photo is where I fell out of my chair one time due to it being a wheelchair I was not accustomed to and a dip in the ground. It had nothing to do with the lift as it was at the front of the cabin at that time. I used the opportunity to play in the grass with my dog for awhile before getting help to get back into my chair.
So simple and reliable are the mechanisms for this lift that I have seen one converted to transport a user from the main floor of the house to the basement and back up. It required its own support system, much larger than the triangular vertical support that the lift was designed with, but the motors, gears and cables worked very well to safely get a person between floors without concern.
I understand the closed operating system of modern lifts and how the safety is not a bad thing. Sometimes, though, it's nice for someone who is skilled at adapting or modifying things to be able to take a solid piece of technology, like this lift, and tweak it to be well suited to function in a way or location other than originally intended.
If there is anything that Challenging Reality has shown, and this man has learned, it's that often the best solutions are not something you can find mass-produced.
Source: No longer made. Available used from adaptive equipment sellers' classifieds sources such as abilities council or Canadian Paraplegic Association. I would recommend a new lift for intended purposes or one made from scratch for custom purposes.
Monday, July 28, 2014
Ramps - Erindale Pond
Continuing the series on ramps, we will take a look at one of the urban ramps I have encountered multiple times. The one pictured above leads up from the Erindale pond in Saskatoon, Saskatchewan. The path around the pond is quality asphalt, reasonably level with only a few instances of lips where the building materials transition between concrete, paving stones or asphalt. The tricky part comes when you need to climb up from the shoreline to get back to your vehicle or where you came from.
Often a photo does not accurately represent the grade of a ramp and I fear that this photo is one of those, despite my best efforts. This ramp is reasonably steep for an urban setting but it is very long and without any level portions where a rest might be appropriate. Other techniques, such as allowing a wheel to back into the landscape tie at the side of the ramp, can work when a rest is needed, however, often there are no options like this and the only alternative is to turn your wheelchair sideways to lessen the effort needed to prevent rolling back down the ramp. The biggest problem with this sideways parking technique is the energy it takes to get straightened out and resume climbing.
I mention that this ramp is a reasonable grade for an urban setting. Far too often when new strip malls or other buildings have their parking lots paved the grade of the slope leading to either a concrete curb cut or the ramp leading into the building is ridiculously steep. For whatever reason, our home builder told us that they legally could not build my ramp in the garage because it would be a grade of 1:10, 1:12 being legal for a public building. This was our own private dwelling. The number of parking lots I see with ridiculously steep slopes before you actually reach the curb cut, sidewalk, or ramp to the building's front door are ridiculous. Situations like this display thoughtless guideline compliance without any common sense.
Thankfully, regardless of a slope's grade, devices such as hill climber brakes exist and can be used to grab your wheels so you cannot roll backwards. Those will be examined in the future.
We are thankful that these ramps exist, as opposed to simply being stairs, but improper implementation makes them less effective in building a barrier free community.
Source: Urban settings and do not be afraid to contact your city counselor if there are blatant problems with a local ramp, be it the condition of the building materials, the grade or transitions from level ground to the ramp or the ramp to the surface at the top.
Monday, June 30, 2014
Ramps - Our Deck
The time has come to begin my series on elevated access. By that I mean ramps and lifts that enable us to access those places not on ground level. I say that the time has come because until now I have focused on subjects whose consequences have the greatest impact upon quadriplegics. Ramps and lifts affect such a broad range of disabilities it would be difficult to list them all.
This ramp is the one in our backyard that allows me access down to our patio, flower boxes and lawn. Our deck supports are made of treated lumber but the surface materials are made from Trex composite material that does not require staining or care of any kind. That, combined with the aluminum railings, was undoubtedly more costly initially but over the life of the deck the savings in stain and labor to maintain it will easily pay for the additional cost. At some point I will discuss the invisible costs of living with a disability. Paying for labor to do something as simple as stain a deck is one example of those less visible costs.
Though it does not look very steep because of my choice of ultra-wide-angle lens, the ramp is the building code standard of 1:12, which I find a very easy climb, unless my push rims happen to be wet from watering flowers or chasing the dog with the hose. Times like those I am grateful for my hill-climbers which, when engaged, prevent me from rolling backwards. On occasion the flat landing halfway up the ramp has been a great benefit to either have a different view of our backyard or to be a place to turn around and chase the dog back down.
One final note for anyone looking to build or modify a home to be barrier free: Be aware of your space limitations on each side of the house. On one side we have crushed rock, which I cannot access nor cross. On the other side, by the patio as pictured above, is a sidewalk that leads to her front gate with the inconvenient exception that the air conditioner blocks my path. Had we known, or had our home builder being more mindful of the situation, we would have either relocated the air conditioner or had it installed higher up so that getting past my wheelchair, or with the lawnmower, would be possible.
Source: Custom-built by our home builder to suit the size we wanted and the space available.
Labels:
aluminum,
composite,
custom made,
evening,
hdr,
landing,
lights,
mobility,
outside,
quadriplegia,
railing,
ramp,
recreation,
rope,
tetraplegia,
trex
Monday, June 23, 2014
Zip Ties, Split Rings, and Paracord
When it comes to dexterity few things are as challenging as zippers. Tiny little tabs designed to be pulled with a pinch between the index finger and thumb. Not quadriplegic friendly.
My simple solution for a lot of years was split rings. I think every keychain in my parents' home was scavenged for this purpose. The fact that my dad had a small collection of keychains help my inventory of split rings to grow quickly. It's remarkable how many zippers there are to benefit from a permanent ring on them. Zippers are everywhere.
The one place that I most wanted my adaptation to be less visible was on the fly of my pants. For that location I chose to use a small black zip tie, as barely visible on the pair of jeans in the photo above. Zip ties like that do wear out in time and a few did break on me, leaving me with a bit of a struggle to do up my pants until it could be replaced with a new zip tie. Thankfully that zipper does not need to be started like on a full-length jacket zipper. I have no secret method to assist in starting a zipper on a jacket. That is simply a matter of trial, error and patience.
Though I still use split rings for a lot of purposes, I have transitioned to using paracord for most of my zipper pulls. There are a myriad of colours to choose from and their flexibility can provide minor advantages over split rings in certain circumstances. I have even begun transitioning away from bungee cord and toward paracord for my pant hooks. The snaps that connect two ends of paracord together to make a pullable tab and loop, like those attached to the yellow and black paracord in the photo above, are cheap and abundant on places like eBay. However, I found the ones I chose to not hold nearly as well as they should. I made certain to make my selection based on the size of paracord I was using, prepare the ends by cutting and melting them and made certain the snap was applied properly, but often it would let go at inopportune times.
The alternative is to simply thread your length of paracord through the zipper eyelet then tie the two lengths in a half hitch, as I have done for the zipper laying immediately to the left of the pouch, the second one to the right of the pink lanyard. A more interesting alternative is to tie an interesting knot in the end and use it as a lanyard, essentially a simplified version of the lanyard I tied to be my keychain. As frequently as we are forced to compromise form for the purposes of function, this is one of those simple places that I appreciate the more decorative look of a diamond knot lanyard over a simple half hitch. I decided to get extra fancy and do a double diamond knot for the longer zipper pull on my camera bag.
Hit me in the comments with your zipper adaptations, if you have any unique methods.
Source: paracord and snaps – eBay. Split rings – dollar store or craft supply store.
Monday, June 2, 2014
Lanyard
You've already seen this lanyard in my post regarding door bumpers to assist in pressing remote buttons. These little well tied loops of rope or cord can be so helpful in so many other ways. Keeping keys attached to something easy to grab a hold of, and easy on the teeth for those times you need to hold on to them with your mouth, is a big deal because the alternative is dropping them. For many quadriplegics, or any wheelchair users for that matter, picking things off the floor can be very difficult. Especially if you already have something on your lap or are in the middle of a snow-covered parking lot.
A lanyard can be homemade, bought cheaply from any discount store, and be almost any length you need to fit your intended purpose. As attractive as the Solomon bar weave is on the upper part of this lanyard, it is the diamond knot that I am most grateful to be able to tie successfully. That knot makes for not just a loop to hold onto but a nicely sized ball of cord to incorporate into a zipper pull, making the challenge of operating a zipper a little bit easier. Here are my thoughts on zippers. While the white part of the cord is illuminated by a camera flash, the green part is because of the glow-in-the-dark material used to make this lanyard. It's a little more expensive than standard paracord but for those times I wanted to be able to find my keys in the dark I'm glad I chose it for this keychain.
The reason I like paracord so much is that when used to secure keys, as shown in the door bumpers post linked to above, is that it is quite easy to detach the keys for those times when you need to separate your vehicle keys from your house keys, such as when leaving a vehicle for service. I prefer this over the quick clasp lanyards that you can purchase in stores because often those clasps are spring-loaded and pivot which makes operating them very difficult, and a danger to a person's lip should you choose to use your teeth and have the clasp snap shut.
In the future we will take a look at other lanyards of the smaller size used to keep smooth and difficult cell phones closer to us and less likely to be dropped on the floor if they slip out of our hands. Because I did not want to be tied down by a lanyard hanging off my phone I chose a very rubbery case and the larger design of the Samsung Galaxy Note 2 for my current phone, which I talk about in the post regarding touch screens and styluses.
Source: Webbed lanyards - Department or DollarStores
Paracord and Premade Paracord Lanyards - EBay and Etsy
Monday, May 26, 2014
The Island
The top level of the island pictured above is a standard countertop height. It still has a significant degree of functionality for me but is primarily my wife's surface for her kitchen needs. The lower surface is a mirror image of the top level of the island with the two essential aspects. Firstly, the fact that I can roll under it anywhere along the front or sides. Secondly, the lowered height of it, which was chosen based off of other surfaces that have worked well for me. Having this large surface available to me has given me almost complete freedom in the kitchen to cook as effectively as I do.
A plug-in at each end of the island allows me to use multiple electrical appliances at the same time and the front 15 cm of the upper-level, where you see the coffee grinder, salt shaker and pepper grinder, is accessible to me to help keep my work surface as free as possible. If I had to do it all over again, given the space available to us, I would have rotated the island 90° and made it another 15-30 cm wider. Too often I am left with a slightly tighter preparation area than I would like when there is a hot pan or wok beside me. I am careful, but this has caused the occasional burn. Thankfully I have not, yet, spilled a vessel of hot food on the floor.
Though height is important, the most important thing is by far the fact that I can roll right under it and be facing forward while preparing. The same goes for being able to roll under a sink, be it in the kitchen or bathroom, or my workbench downstairs. Anytime I have been forced to pull up parallel to a vanity, and twist my body to try to use the sink, it results in a back ache and shoulder pain after an extended period of time. I can get by but I really appreciate having my work surfaces fully accessible.
Source: Custom made by the cabinet company who worked with our home builder. Easily done by any cabinet maker.
Labels:
cabinets,
coffee,
cooking,
cupboards,
custom made,
eating,
food,
kitchen,
living,
quadriplegia,
tetraplegia
Monday, May 5, 2014
Reaching Rod
My friend, a fellow quadriplegic, and I often jokingly express our envy of paraplegics and their functioning hands. I've heard it said that quadriplegics just want to be paraplegics, paraplegics just want the able-bodied, and able-bodied people want to be Superman. True or not, it would still be nice to have proper dexterity and even be able to use the common gripper-extension arm with a pistol style handle that can be squeezed to close the pinchers at the end to aid in picking things up off the floor. Even those are mostly unusable by us as they require us to use two hands to squeeze the trigger and typically that needs to be done directly in front of our chest using stronger arm or pectoral muscles which negates the reach advantage it is supposed to provide.
With a bit of creative designing and a few imperfect results, my dad and I came up with the above product. By slipping the T-shaped end into The Gloves I have a very helpful extension to my arm to aid in many tasks. My primary uses are reaching certain light switches in our home, assisting in opening the kitchen blinds whose pull cords are just out of reach and, most importantly, gently closing our barbecue when enjoying the pleasures of cooking with it.
The only modification made over time was the addition of a few wraps of hockey tape to increase the friction of the surfaces it comes in contact with. The rubber hose that covered the T and hook ends had deteriorated so I improvised with hockey tape. Without it the plane, smooth, painted steel would occasionally slip off of the surface I was using it on.
Regarding the photo, as previously mentioned and in the interest of full disclosure, I do very little digital manipulation of my photos. This one was one exception where the fishing line used to suspend the rod was removed digitally.
Source: Any beginner welder should be able to fabricate something like this for you and a similar device probably could be manufactured just by heating and bending a single piece of steel rod.
Labels:
cooking,
custom made,
extension,
grip,
hockey tape,
living,
quadriplegia,
reaching,
rod,
steel,
tetraplegia
Monday, April 28, 2014
USB Flash Drives
USB ports can be frustrating for anyone - lining up the plug with the port, making certain it's facing the correct direction (help us, if it's a vertical port!) - but with paralyzed hands it's even more difficult. A streamlined design, like that of a laptop, makes for a minimal distance between the drive and the desk or table, providing even less surface area available on the drive to grasp. Thankfully, many USB flash drives have a suitable place to attach a lanyard or split ring. Of course, the split ring attached to my monkey's fist self-defense paracord creation is an exaggeration, but made for a more interesting photo.
Either a lanyard or a split ring will assist in easing the removal, but I find the split ring to give me a more solid place to insert my thumb which also helps in sticking the drive in the port. Many USB peripherals do not have ways to make them more convenient for us. But many do. There are a myriad of interesting and unique designs for flash drives and often something as simple as a binder clip can provide a larger handle on almost any USB device.
Source: Split rings are available from any department or hardware stores.
Interesting USB Drives are abundant at online retailers like Deal Extreme, Amazon or eBay.
Monday, February 24, 2014
Krulick's Soap Grippers
Last week's post discussed bath seats and how they have been ineffective for me. This week is another one of those adaptations that just didn't perform as indicated. Very simply, Krulick's Soap Gripper is a split ring, above a suction cup which has a cylindrical stud in it, intended to be pressed into the bar of soap to add to the suction cup's holding ability.
The problem is that the suction cup stops holding as soon as the soap dries and the stud that is intended to press into the bar of soap is too wide across, hollow and flat making it incredibly difficult to press into the bar. If it weren't hollow it could be carved into a point to help get it started into the bar of soap, but as it is I'm not sure an able-bodied person would get it secured to the bar without a struggle. While trying to apply the gripper properly for this photo I dropped it more than a few times, as seen by the flat spot on the soap facing the camera. It wouldn't be so bad to receive assistance affixing the gripper to a bar of soap every so often, but there is another problem.
The split in the ring makes it loose so it falls off my finger very easily, before the soap even gets wet. I know the intent is to fit fingers of all sizes, but falling off that easily makes it little to no help at all. Had I needed to come up with an adaptation for a bar of soap it would involve drilling a hole through the bar and running a bolt through the hole, a washer on each side to make up for any shrinkage due to use. to that I would secure a paracord lanyard to hold it on my wrist or around my neck. That would be all with nylon hardware. You won't get clean with rusty soap.
Of course, liquid soap, maybe with a sponge on a rope, is a whole lot easier than either of these options.
Source: Occupational therapy device catalogues, seniors' supply stores.
Monday, February 17, 2014
Bath Seat
The bath seat pictured here is not the standard removable seat that is just placed in the tub for use when needed. It was built right into the house with the intention that I would be able to use it to gently lower myself into the tub and lift myself out to dry off and get dressed on. This never happened. To this day I do not think I would be strong enough to use it and it was soon supplemented with a hydro-powered bath lift. Unfortunately, the difficulty transferring unclothed, combined with the rubberized shelf liner-style rubber material covering the lift to prevent slippage, did just that. It was too difficult to transfer from my chair to the bath lift without causing damage to my skin.
The two times I did use it I greatly enjoyed being mostly immersed in water and enjoying the benefits of the water jets on my body. But, after being that relaxed and the heat tiring me the transfer out was very difficult and negated almost all benefits of using a tub. I know this is not the case for many stronger quadriplegics and many paraplegics, but for me showering is quicker, easier and my bathing method of choice. I reserve my full immersion in water for hot summer days at the lake or nice hot pools, such as the Temple Gardens Mineral Spa in Moose Jaw.
A less costly and less permanent option for anyone wishing to try using a bathtub might be the removable bath seat that actually sits in and over the edge of the tub. It's more secure than the smallest standard bath seat you might see but both of them still don't allow you to get much more than your legs wet. I realize that they could also be used as a seat for showering but I am grateful to have had a roll in shower over the years.
As much as this bath seat did not work for me to assist with bathing, next week I will show you the Krulick's Soap Grippers that were completely useless to me.
Source: The built-in bath seat was included in the renovation. Portable, removable tub seats are available from most adaptive equipment supply stores or discuss with an occupational therapist what would be best for you. They may even have some available for you to try some before buying.
Labels:
bathing,
bubbles,
comfort,
commercially available,
custom made,
faucet,
grooming,
hose,
lift,
quadriplegia,
shower,
spasm,
tetraplegia,
tile,
transfer,
tub,
warmth
Monday, January 13, 2014
Card Holder
Card season is upon us more than ever. That first snowfall outside, as seen in the photo above, happened way too early this year and last year but there is little a person can do except to find favorite ways to be entertained indoors. Any game with cards is a popular one.
There are commercially made cardholders available on the market but I have found that many of them require as much dexterity as holding cards does. Such things as spring-loaded clips or awkward angles where cards sit in fan-shaped slots, both of which are no easier than simply holding the cards with paralyzed fingers.
The cardholder you see on the table was the result of my dad seeing his son struggle with the cards, telling everyone to "hold on, a minute," finding a scrap of lumber, cranking the tablesaw blade to a 45°, running a cut half-deep through it and then slicing the scrap of lumber into two equal pieces. The result was two identical cardholders that I use for any game that requires holding more than about four cards. This cardholder is long enough for at least 13 cards. Occasionally, for games that use nonstandard decks of cards, I wouldn't mind if it were a little bit longer. Usually in those cases cards can be grouped together, though. Length is something to consider if you are having one made for yourself.
Having it sitting on the table allows me to use two hands to pick up and arrange cards and it is easily tipped on its face to conceal my hand, should I need to leave the table for a minute.
This is not a tool exclusive to a quadriplegic. A person with carpal tunnel syndrome, arthritis, tremors or any other condition affecting dexterity would benefit from something like this and be able to maintain a fluid pace of gameplay.
Source: Custom made. Commercially made devices available at some medical supply stores, through an occupational therapist or online.
Labels:
29 point hand,
cards,
crib,
cribbage,
custom made,
dexterity,
fingers,
lumber,
quadriplegia,
recreation,
social,
tetraplegia,
wood
Monday, January 6, 2014
Trackball
We conclude this series on productivity with the effectiveness of a trackball for individuals with paralyzed hands or reduced dexterity. To begin, we looked at old-fashioned writing by pen with my writing splint, examined the evolution of voice-to-text software and weighed the pros and cons of touch screens and styluses.
I mentioned in the discussion about touchscreens how complex some of the gestures are becoming for different apps and functions on various touch screen devices. The same can be said for many of the touch pads or track pads of current laptops. Many of the gestures require greater dexterity than many of us have. Thankfully, being a computer with a full keyboard, there is most often a fairly easy workaround. However, when it comes to standard input where precise navigation or movement is required I still find working with a trackball, two-handed, to be the most effective.
In a pinch I can work quite nicely with a mouse for simple actions. I can point and click with reasonable accuracy, even if slower than I would prefer. When it comes to needing the precision of selecting an area one pixel in size, such as resizing a window or column in a spreadsheet, using a mouse is tedious to line up exactly where the cursor needs to go and hold it there while attempting to click without moving the mouse. The rocking my hand to add pressure to the mouse button until it clicks is where the mouse may be moved away from that precise spot before the click occurs. When it comes to using a photo editing program, be that Adobe Lightroom or Adobe Photoshop, precision is essential and without a trackball my photo editing would be significantly less sophisticated.
Trackballs are becoming less common and harder to find. In the last 15-20 years they began few in number, grew to a much wider selection and are now tapering off. Thankfully, Kensington is still around and still your best bet for a company that produces the best quality trackball. If you are planning on purchasing one double check the compatibility. Some of their older and best models do not play nicely with newer operating systems and some of their newer models do not play nicely with older operating systems. Read your reviews and check compatibility before you order one.
One final note. Many trackballs have more than two buttons and a scroll wheel. Some have up to seven buttons, all of which can be programmed to perform the function you want. That means if you need to be able to hold control or shift while clicking, reprogram those buttons for gaming or whatever other function you may need to make your computer work easier, you should be able to.
Source: Staples Business Centers have a reasonable selection but online is your best and most affordable source.
Monday, December 9, 2013
Door Bumpers
My original use for these door or drawer bumpers was on the remote starter of my previous vehicle. That remote is not pictured here but it was similar to the right most remote in the photo above. The problem with the previous remote was that it had recessed buttons. The buttons themselves were not the problem. It was that with only four buttons on that old remote one was dedicated to locking, one to unlocking, one to opening the door and lowering the ramp and one to the lifting the ramp and closing the door.. The only way the installers could program the module to start the van was by pressing the lock and unlock keys simultaneously. Because they were recessed this presented a problem for me.
It wasn't that I couldn't do it but I required a surface to set the remote on while I pressed each button with my two thumbs. When I had something on my lap, or no firm surface to rest the remote on, it was difficult. And, when do you need automatic vehicle starting the most? In the winter when it's cold and you don't want to be fumbling with a remote longer than necessary. Self-adhesive door bumpers cut to fit each button was my solution.
It worked but was not ideal because making the buttons that much easier to press made for accidentally unlocking or locking the doors and only once accidentally starting the van. This was also before the time of two-way communication between the vehicle and the remote -- you now receive notification that your vehicle has started -- so it wasn't until an undetermined amount of time that I realized the van had been started.
Thankfully the buttons on my current remote, pictured left, have just the right amount of tactile resistance and are raised only slightly, requiring a one second press before activating the function. All buttons function as indicated by their symbols but two consecutive presses of the unlock button, with a two second pause between, opens my door and lowers the ramp or picks up the ramp and closes the door. This is a much more convenient way than depending on the door bumpers but they did work when I needed them to.
Source: Department, hardware, and dollar stores.
Monday, September 30, 2013
Pant Hooks
There have been more than a few medical professionals, often from locations where the number of quadriplegics are far fewer, who assumed that catheterization can only be completed, entirely unclothed, while laying on a bed or stretcher. That is an unfortunate and unrealistic understanding by people who should, as much as they need to preserve people's lives, be aware of the need for quality and normalcy in those lives.
In the previous post I spoke of catheters and some of the options available. Aside from performing the task of catheterizing as mentioned in the linked post above, it can be quite simple with the appropriate piece of equipment. The photo is of the technology I devised and, once again, my dad built for me.
Very simply, a piece of welding rod tacked onto a large lock washer then covered with rubber or plastic hose. To each washer a length of desired material was secured. To use it, one hook is secured to the waistband of your pants and underwear while the other end is hooked to the frame of your chair to keep the clothing away from your body.
The red pant hook on the right is 16 years old and still going strong. It is starting to show signs of wear, despite re-taping the crimps that hold the bungee cord to the washer. The hook on the left is my newest iteration with a slight increased angle to the hooks so they hold more securely and the washers being joined by a precisely measured and tied length of paracord.
I don't know how many more years the original hook will last. I have one in my backpack that always stays with me, a spare in the drawer and another at my parents' house. So, when it gives way I will certainly have readily available replacements as well as the original hooks which can easily be re-tied with a new length of bungee cord or paracord.
Regardless of how long it lasts, I know that it has outlasted the original version conceptually thought up by me and fabricated by my occupational therapist while I was in rehab. The one she created was a composition of elastic waistband, coat hangers bent into shape, covered by hard plastic coating. The coat hangers were not covered in any protective material and punched holes in my clothing. As well, after just a few weeks of using it the elastic was already beginning to fray.
Men Versus Women
I know that the system works for me whether I am wearing sweatpants, sport pants, jeans or dress pants. I also know that the amount it is able to lower properly fitting clothing would not be adequate for a female quadriplegic. I understand that there are women who have chosen to have clothing modified with Velcro closures and others who simply need to take the time to lower their clothing far enough to get the job done. That is the extent of my understanding and if any of the female readers of this site wish to contribute technology, be it an actual device, modification or just information, it would be greatly appreciated.
Source: Custom-made by anyone who has basic welding ability. Many of the bungee cords you can buy now have plastic hooks that are much thicker and would reduce the concern of damaging clothing or skin. The difficulty might be in finding the appropriate length of cord so that the tension between pants and wheelchair frame is correct.
Monday, September 2, 2013
Strengthening
Exercise is important for everyone but even more so for we quadriplegics. Keeping our arms and shoulders strong as long as we can, to maximize and prolong our independence, is not just for our physical health but our mental health, as well. The question is, outside of rehabilitation centers, when was the last time you saw a fully wheelchair accessible gym? That is, with cuffs and quadriplegic-friendly handles on the weight machines, not just machines that can be wheeled up to.
Downstairs, collecting dust, is a weighted pulley system with the adjustability (much of which I cannot adjust independently) to perform a small variety of motions to work different muscles and muscle groups. It is not too large and cumbersome but enough so that it does not have a dedicated place in our home to be mounted to the wall. There are a few locations that it could be placed but they are tucked away in most uninviting and unmotivating locations. Therein lies one of the largest obstacles to regular exercise for many individuals, disabled or not, which includes myself. Lack of motivation.
A good friend and I make regular visits to one of the city's indoor facilities which, after a lengthy process of cutting through red tape and persistence in communicating with the right individuals, has a fully accessible workout machine. Unfortunately, it's is in a cramped room with a number of other workout machines used by many individuals who do not understand the importance of not blocking the accessible machine with cooldown mats, chairs and other clutter that prevent us from using it. Add to that the missing handles, pins or other disrepair and what could be a very effective machine has become more of a hassle than a help.
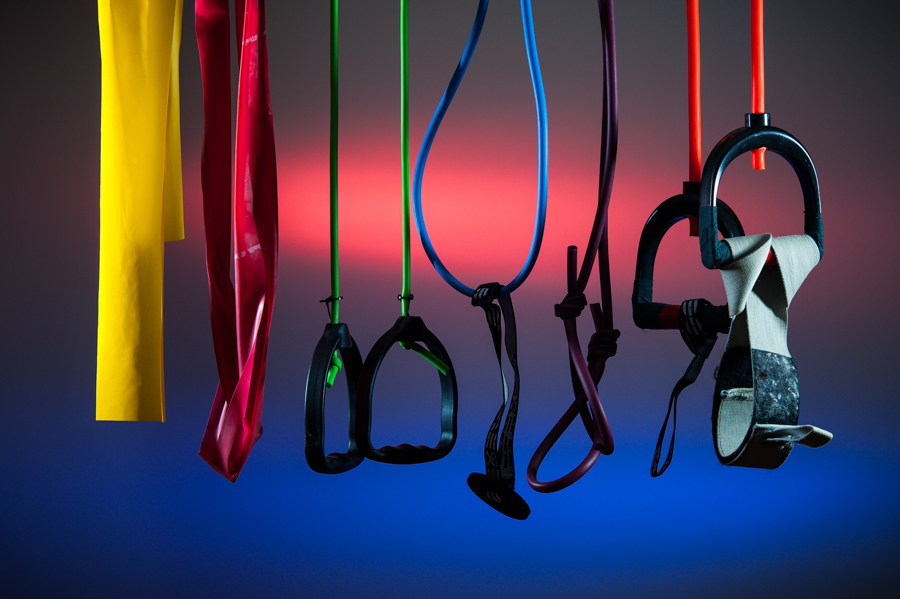
As a result you will find us most mornings wheeling on the track and allocating time to use the therabands in the picture above. Those therabands are lightweight, easy to transport, made to fit our needs and can be used anywhere. It is in front of a TV or near a stereo that I find it easier to grab the therabands and work with them while watching or listening to something, rather than tucked away by myself in the basement where the weights and pulleys would be.
From left to right you have theraband ribbons and theraband tubing, increasing in resistance from left to right. This particular ribbon is latex, unfortunately. The endless white powder that comes off of them is a significant irritant, even an allergy, to a lot of people. I am unaware of non-latex theraband ribbon, which is unfortunate because ribbon is much easier to carry than the tubing. The handles accompanying the green theraband tubing are nicely adjustable to allow any length between them which makes them suitable for the widest variety of exercises. The disc and strap attachment on the slightly stronger blue tubing is designed to be slid behind a door before closing it to provide an anchor point for the tubing. This provides a solid, adjustable, place to pull from without the fear of damaging a lever door handle or other makeshift anchor point. We often slide this between the wooden slats of the benches surrounding the track where we wheel.
Simple loops tied in the end of the purple theraband tubing allow a place to grasp, or wrap around the wrist, to get the right length for various exercises. My strongest theraband tubing came with handles that had a red plastic tube that rolled as you used it. For someone who cannot grasp the rolling part it was a 50 pound slingshot waiting to hit someone when it fired out of my hand. Consequently it was secured with hockey tape and had other wrist straps added to the handles to give a secure place from which to pull. The gray strap was originally one that I had used to secure my legs together and assist in getting them pulled onto the bed when I was still rebuilding my strength, post injury. As with my razor cuff, it was made by an amazing fabricator that worked at the rehab facility I was at. Thank you, again, Beulah.
In addition to the therabands, sitting next to my computer are dumbbells that incorporate Velcro straps. Unfortunately they only go up to 5 pounds and are difficult to double up on one hand or arm comfortably. Even at 5 pounds they often cut into a person's hand when being used. That may be why they are only available with Velcro up to that weight. I imagine if I thought about it and work with some paracord I could come up with a helpful handle for the 15 pound dumbbell in the back, but the fear of dropping it and damaging the floor or hurting myself is greater than the payoff. Thankfully the therabands can very easily be doubled up or stacked to add as little or as much additional resistance as you would like as your strength grows.
Not pictured are the pair of 1.5 pound wrist weights that can be Velcroed on to either the dumbbell or a person's wrist to add that little bit of extra weight. Unfortunately, with our arms being as skinny as they are and no longer tapered, typically the wrist weights slide up and down the arm as you raise and lower it to perform the exercise. Currently one of them is employed as a counterweight for the opposite end of my boom arm used in making many of the photos you see on this site.
Source: Dumbbells - Department and sporting goods stores.
Therabands - Occupational and physiotherapists and online retailers. Bodylastics is where we got our last batch from.
Labels:
beulah,
commercially available,
custom made,
dumbbell,
exercise,
health,
latex,
non-silicone,
paracord,
quadriplegia,
recreation,
resistance,
rubber,
strengthening,
tetraplegia,
theraband,
velcro
Monday, August 12, 2013
Utensil Handles
When I was still attempting to cook without gloves on, to prevent any mess on them, I had my dad adapt a number of utensils with inexpensive drawer handles found at any hardware store and many department stores. These are just a different style from the type I used for the Roll Handle on our headboard. I had him modify a few flippers, a ladle and a large serving spoon. For some I had him open one end by cutting off one of the posts of the handle. This made it easier to slide my hand parallel along the handle as opposed to perpendicular as would be the case with the handle pictured above.
It does require drilling a hole in the handle with either a vice and drill or a drill press but that is not too difficult for anyone comfortable with tools. I would recommend substituting the machine screws that come with the handles with either a galvanized machine screw or a nylon machine screw. They are more money but seeing the rusting problem with my previous solutions I would definitely recommend spending the few extra cents for something that is not going to wear out due to rust or, potentially, get rust in your food.
The problem with holding onto the utensil perpendicularly, with compromised wrist strength, is that flipping something like an egg or a grilled cheese sandwich is not done easily and fluidly. The open-ended handle helped to make that easier but, over time, I have ended up just using standard utensils and let The Gloves do the work. I posted the above photo because it was a very good solution for me initially and may be a good solution for someone reading this.
When choosing utensils to purchase I find a wider flatter handle, possibly with some rubber incorporated to it, makes for the most effective tool for me.
Source: Most department stores and any hardware store.
Monday, July 22, 2013
Knives
The commercially available adapted utensils are overpriced and ridiculously ineffective. I often wonder if the occupational therapists or engineers who develop these actually tried them. They are laughable and the day I started using my favorite hunting knife for chopping and spreading was a huge step forward from what my occupational therapist provided me with.
The adapted knife with a serrated blade, laying on its side, is designed to have you stick your fingers through it and the blade protrude perpendicular from the user's palm. The blade has a useless point and is far too flimsy for any serious work. More than that, is the fact that many quadriplegics have weaker muscles in their chest which would be required for the safest movement of "sawing" left to right in front of you. The stronger muscles are those which pull things toward the user which would make for a nice stabbing motion with this device. However, that's not terribly concerning because the point in the flimsy blade make this thing very safe but very ineffective.
The second adapted knife, the one sticking in the carrot, is only marginally sharper than a butter knife. I tried grinding in edge on it with a rotary tool and refining it with a wet stone but this metal just will not take an edge. In addition to that, the short blade combined with the typically curved fingers of a quadriplegic (an example of this can be seen in the next photo) means running your hand through just about anything you are trying to chop or spread. Again, not well thought out.
Source: Occupational therapy catalogs and certain specialized sellers online.
My solution has been a decades old serrated knife. In my dad's much appreciated efforts to help furnish my first home, a lot of knives of this style were purchased at garage sales. Most certainly serrated blades and the styles knives have a much lower likelihood of cutting yourself with. That also translates into much greater strength needed and much more time required to complete any prep work required with a knife like this. Slicing an onion is almost a joke with this knife and I would even imagine trying to shave paperthin slices of ginger root with this knife.
However, it is perfect for any spreading needs or a quick opening of a package and seldom leaves the countertop above the lower portion of the island where I do 95% of my work in the kitchen.
Source: In my case, garage sales. I imagine department stores would sell knives like this new for a very reasonable price.
There are specialized tools by the hundreds for common kitchen tasks. Many of them work well and many of them are junk. Regardless of their effectiveness, nothing beats a razor-sharp chef's knife for me. One tool for so much and, as long as I am the dishwasher in our home, that much less time spent washing dishes. Besides that, why would I want to be running to the drawer or cupboard for special tool for every little different task?
Where a universal cuff positions a utensil to protrude between the thumb and index finger, I would not feel comfortable using one to hold my chef's knife. The grip and tight fit of my gloves is something that a standard universal cuff cannot provide. Perhaps a cuff with a wider band and something with grip on the inside between the palm and the utensil might make an adequate adaptive device. For now, my gloves are serving the purpose well and in 10 years of significant cooking I have cut myself less than five times, none of them seriously.
I do appreciate a knife that incorporates some nice grippy rubber in the handle but I have yet to find a high-quality knife that does so. The large handle of my favorite knife, as pictured above, fits snugly in my glove as I mentioned and a safe grip is not a concern. The sharpening steel below it is, though. The perfectly smooth handle makes it difficult to hold firmly in my glove without it slipping out and the blade of the knife slipping with it. So far I have simply used the nice wide rubber bands from bunches of broccoli wrapped around the handle of the sharpening steel to add grip (they were removed for this photo) but another solution for any handle you need extra grip on might be Plasti-Dip, as mentioned in the post about it and my typing pencils.
Finally, I do not mind using a medium-sized kitchen knife when I need to. However, the shorter blade and smaller handle make it less effective than my favorite full-size chef's knife. A paring knife is out of the question for me to use safely and effectively.
You do get what you pay for when it comes to owning a good knife that will keep you safe from slips and if you wish to keep the edge on your blade hand wash it and don't run it through the dishwasher. The heat will get rid of the edge on your knife faster than carving a turnip or squash.
Source: Knife stores, kitchen specialty shops and certain hardware stores.
Monday, July 15, 2013
Universal Cuff
This is a standard universal cuff designed to Velcro around the hand. The pocket provided on a standard universal cuff is typically the right size for something like a piece of cutlery, toothbrush or other similar sized tool or utensil. Ironically, our standard cutlery was too large for this cuff. A prime example of how these cuffs can be very application-specific. As mentioned previously, I had a larger version that I used for my razor. I have also seen versions large enough for a modified ping-pong paddle or just about anything else with a handle of a smaller size. Some of the premade universal cuffs have a pocket, or even just a sleeve instead of a complete pocket, made out of an elasticized material so that they can accommodate a wider variety of utensils or tools. What I have found with these is that unless the tool is really big the elasticized sleeve does not provide enough tension to properly hold utensil, which results in it falling out or sliding all the way through so that the tines of a fork, for example, are right up against your hand. Once you get larger than a standard smaller size, say a pool cue, fishing rod, tennis or badminton racquet, there is a larger version that falls outside a standard universal cuff that will be shown in a future post.
As this cuff is shown it may be considered upside down by a lot of users of universal cuffs. Typically the utensil would be positioned the other way, with the pocket side of the cuff against the palm of the hand. For me, I found that it added additional helpful tension to use a universal cuff upside down. This way when pulling my wrist back into extension the raising of my tendons on the back of my hand would add tension, making the utensil less likely to slide out of the pocket. Something could be added to the utensil for additional grip to make it less likely to slide out of the pocket, but that means not just having a universal cuff but specialized cutlery to use with. It is a small additional price to pay for independence but it is one more adaptation to consider and possibly eliminate when the time is right.
I no longer use universal cuffs for anything. As mentioned in the Plasti-Dip and Typing Pencil article, I type with a pencil woven under my index finger, over my middle finger and under my ring and pinky finger, with the eraser side coming out the bottom of my hand, which is what I type with. For eating I rest the fork on my thumb with the end of the handle between my middle and ring finger. For anything involving cutting I place the knife between my palm and my glove with the handle of the knife protruding between my middle and index finger, as will be demonstrated in next week's post regarding knives.
Source: These are available in occupational therapy catalogues, but since each application can be so specific, they are typically custom made by an OT or aide.
Labels:
commercially available,
cooking,
custom made,
d-ring,
eating,
fork,
health,
living,
pocket,
quadriplegia,
recreation,
sleeve,
spoon,
strap,
tetraplegia,
toothbrush,
universal cuff,
utensil,
velcro,
webbing
Tuesday, July 2, 2013
Plasti-Dip and Typing Pencil
Typing with curled, paralyzed fingers is no easy task without some aid. Some quads are able to straighten a finger out enough to type effectively but others are not. There are some commercially available devices designed to fit over the hand between the thumb and index finger and extend a shaft forward with which to type. As with so many things, this is another device to be dependent on and to have with you should the need to type extensively arise.
My solution has been a standard pencil woven below my index finger, over my middle finger, then under my ring finger, with the eraser toward the keyboard. As you can see by the seasoned pencil at the bottom of the photo, they show their wear and do not last forever, especially with each weaving between the fingers including holding the end with my teeth while doing so. However, it does not get more inexpensive to replace, and easy to find, than a standard pencil. I find that the grip of the eraser makes typing more fluid and causes me to slip off a key and type the wrong letter far less frequently.
I have been aware of a liquid plastic coating available for insulating wires, adding grip to the handle of tools or any other purpose a person could find for it. What I did not know is where it could be found any longer. A friend told me of his using this Plasti-Dip to coat the pencil at both ends to add grip, longevity and durability. Since I have started using it I have found it very helpful in making my typing pencils last much longer.
The major advantage of using something such as a pencil or pen to aid in typing is that they can be found virtually anywhere you need them. The top end of a pen may not be as ideal for typing but is still faster and easier on the shoulder than using the side of my thumb, as I do when no other solution is available.
The downside is that the plastic coating product is difficult to find and somewhat expensive, especially considering that when not resealed properly the whole can will harden and be rendered useless. Just make sure the can is resealed properly and this should not be a problem. It is nice that it is available in red, black, white, yellow and green. I learned my lesson when I chose black (specifically for this photograph because I thought it would look the best) not thinking that the black tip does not have enough contrast against my black keyboard which has made it more difficult to type effectively. I have become accustomed to it, though.
Source: Home Hardware on Central Avenue North, Saskatoon, Saskatchewan, Amazon.com and eBay.
Subscribe to:
Posts (Atom)